Project #34 Maura
please read below for errata updates

2/2/23 Update:
Erratum 1:
The first 2 Next rows (NR) in the Set-in-Sleeve Yoke section should read:
NR: Knit across one shoulder seam while adjusting markers (move markers 2 sts to the right/left), CO 28 using the backwards loop method, knit across the other shoulder seam & adjust markers, CO 28, place marker. (134 sts total).
NR: Break yarn & starting from one of the sleeve as BOR, knit all sts.
Erratum 2:
The increases for the color charts are kfb on both sides of sleeves, not m1R or m1L.
The slanted increases are for the underarm shaping on the body only.
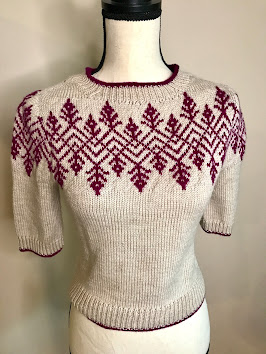
Pattern description:
Instructions for “Maura”
is for size Small only. It is knitted top-down, in-the-round, with
contiguous set-in sleeves & is a fitted garment with no ease from my body
measurements.
It is slightly cropped & falls to
a few inches below navel. The sleeves
fall to the elbows. Garment is finished
with 1x1 ribbings.
Difficulty
Level: Intermediate.
Sample size:
Small, to fit 32” chest, 26” waist, & 36” hips. It should also fit Medium with ~2” negative
ease.
The finished project weighed about 300 g (with loose yarns
clipped & not including gauge swatches).
For the whole project, I needed about 6 balls of Main Color (MC) & 2
balls of Contrasting Color (CC) listed below.
You might want to get an extra ball of MC if you are planning to
lengthen the garment or sleeves.
Materials,
Tools, & Notions:
-Yarn: KnitPicks Swish
DK Weight 100% FineSuperwash Merino Wool in Nutmeg Heather (MC) & in Throne
(CC) – 123 yards/50 grams
-Needles: 29”
& 16” Circular Needle (CN) in size US 6 or 4.00 mm.
-Notions: Stitch Markers, Waste Yarn, Tape
Measure, Yarn needle, & Scissor.
Notes:
Blocked Gauge in
Stockinette St (knit in-the-round): 11.5 sts x 15.5 rows = 2” x 2”.
Blocked Gauge in
Colorwork St (knit in-the-round): 13.5 sts x 13 rows = 2” x 2”.
INSTRUCTIONS
Shoulder Seams
First, make the two shoulder seams, then combine them to knit in the round.
CO 5 sts on 29” CN.
Row 1 (RS): Kfb, pm, k3, pm, kfb.
R2 (WS): P1, pfb, sm, p3, sm, pfb, p1
Continue increasing in this pattern while maintaining
the 3 sts in between the markers, until there are 9 sts to the right of first
marker & to the left of the second marker (21 sts total).
Next, the neckline
is shaped by increasing near the beginning & end of work on the RS of
garment while continuing to make the shoulder seam increases.
Next row (RS): K1, m1R, knit to one st before marker, kfb, sm, k3,
sm, kfb, knit until one stitch left, m1L, k1 (4sts increased total).
NR (WS): Purl until one st before marker, pfb, sm, p3, sm, pfb,
purl until end (2 sts increased).
Repeat the last two rows twice. There should now be 39 sts total.
Make another shoulder seam in the same manner.
Set-in-Sleeve
Yoke:
To start knitting
in the round, first position the shoulder seams with the neckline sides facing. You will also adjust shoulder cap markers so
there are 7 sts in between, instead of 3, & cast on for the front
& back necklines:
NR: Knit across one shoulder seam while adjusting markers (move
markers 2 sts to the left/right), CO 28 using the backwards loop method, knit
across the other shoulder seam & adjust markers, CO 28, place BOR marker. (134 sts total)
NR: Knit all sts.
NR: Knit to body, increase by kfb a total of 21 sts in even intervals across the front, knit to back body, &
also increase by kfb a total of 21 sts in even intervals across the back, knit
until end.
Increase
suggestion: I increased every
2nd st once then every 3rd st nine times & alternated
increasing in this pattern until 21 sts total.
I find that keeping a table helps to track the increases. The body front & back now should have 81
sts each.
Work all rows of the colorwork charts by following the appropriate chart at different sections of the garment. For front & back of body, follow Figure 1. The 16 st pattern repeat is boxed in red. For the shoulder caps, follow Figure 2. Note to maintain the colorwork pattern while increasing, look to the next row in chart to see which colors to knit for the front & back loops. They may be different colors.
Underarm Cast-On & Gauge Correction
In the next round, the underarms (UA) were cast on & gauge difference between the colorwork & Stockinette will be corrected.
NR: *Remove marker & put sleeve stitches onto waste yarn,
CO 6 using the backwards loop method, pm, CO 6, remove marker, evenly decrease
13 stitches across the body while knitting across, repeat * to *.
Work in St st for about 2” from the underarms.
Decreasing for Waist:
Decreasing round (DR) will be worked 4 times at intervals 2.5”, 3.5”, 4”, & 4.5” from the underarms:
DR: Start from 3 sts before BOR marker, *k2tog, k1, sm, k1,
ssk*, knit until 3 sts before next marker, rep * to *, knit until end.
Work in St st for another 3” or until 7.5” from the
underarms.
Increasing
for Hip:
Work the increasing round (IR) two times when garment
measures 7.5” & 8.5” from the underarms.
IR: Start from 1 st before marker, *m1R, k1, sm, k1, m1L*, knit
until 1 st before next marker, rep * to *, knit until end.
Start 1x1 ribbing when garment measures 9” from the
underarms. Work 2” of ribbing. Switch to CC for the last ribbing round, then
bind off loosely using the CC.
Collar:
Using the 16” CN & MC, start from the middle of
one shoulder & pick up 3 out of every 4 sts along the slanted edges
(11sts), pm to mark corners, pick up every st on the horizontal edges, &
continue in the same manner until the end of round, place BOR marker.
Note: I adjusted
the number of neckline sts in the next round so that the ribbing pattern is
more symmetrical.
NR: Start *1x1 ribbing until 1 st before corner marker, k2tog
while removing marker, replace marker, continue ribbing until 2 sts before next
marker (adjust pattern so you can work a ssk 1 st before this marker, I adjusted
by p2tog), then also adjust marker to 1 st prior before working the ssk at the
corner*, repeat * to *, continue in pattern until ending with a p2tog or p,
depending on your st count.
NR: work in 1x1 pattern with no decreases.
Repeat the last two rounds twice so that three
sts total are decreased at each corner.
Continue ribbing for about 1.25”. On the last round before reaching to 1.25”, switch
to CC, & work a very stretchy BO (see below) in CC so your head can fit
through! Regular BO will be too tight.
Stretchy BO:
K1, *p1, take LN & put into back of the 2 sts on
RN, p2tog, k1, take LN & put into front of the 2 sts on RN, k2tog-tbl*,
repeat * to * until last st & draw yarn through the st.
Sleeves:
Put live sts onto the 29” CN & divide them to work
in the magic loop method.
NR: Starting from the middle of the underarms, PU 6 sts, knit
across to the other side of the UA while decreasing 8 sts evenly to correct for
gauge difference (see below), PU 6 sts, place BOR marker.
For the
decreasing, I alternated between knitting together every 5th & 6th
st, then every 6th & 7th st, for a total of 8 sts
decreased.
Continue in St st until sleeve measures about 5.75”
from the UA’s. Start 1x1 ribbing &
work for about 1”. For the last round,
switch to CC, then bind off also in CC.
Endnotes: Thank you for your interest in my
design! If you enjoyed the pattern,
please consider buying me a cup of coffee at:
And follow me on IG/Ravelry:
Instagram: @wendylinkdesigns
Ravelry: Wendy Link
Abbreviations
BO: Bind off.
BOR: Beginning of round.
CC: Contrasting color.
CN: Circular needle.
CO: Cast on.
K1: Knit one stitch.
K2tog:
Knit two together.
Kfb: Knit into both front & back loops of the same
stitch.
LN: Left needle.
M1L: Make 1 left (left-slanting increase).
M1R: Make 1 right (right-slanting increase).
MC: Main
color.
NR: Next row/round.
P1: Purl one stitch.
P2tog: Purl two together.
Pfb: Purl into front & back loops of the same stitch.
Pm: Place marker.
RN: Right needle.
RS: Right side.
Sm: Slip marker.
Ssk: Slip, slip,
knit.
St st:
Stockinette stitch.
UA:
Underarms.
WS:
Wrong side.
Figure 1. Colorwork Chart for Body Front & Back.

Figure
2. Colorwork Chart for Sleeve Caps.