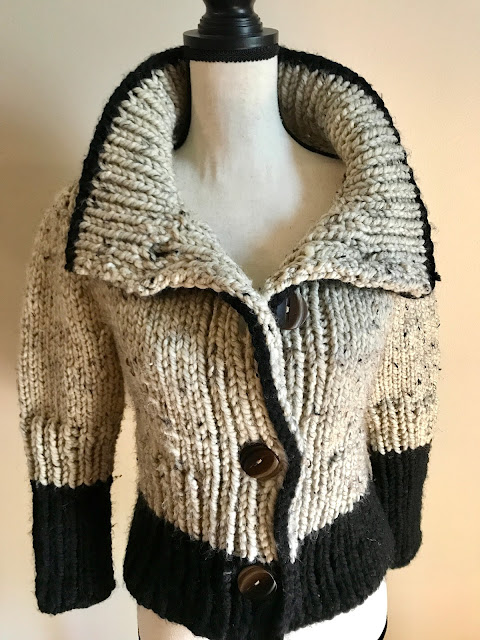
Project #36 Hana

Hana is knitted top-down, in-the-round, with contiguous set-in-sleeves, & finished with 1x1 ribbings. Sample garment is fitted with no ease from body measurements, cropped, & falls to low waist. Sleeves fall a few inches above elbow.
Sample garment is in size Small. Designer is pear body-shaped, & petite
(5’4”).
Difficulty Level:
Intermediate/Advanced.
Sizes: Small (32” B,
26” W, 36” H), Medium (34” B, 28” W, 38” H), Large (36” B, 30” W,
40” H).
Sample garment (S) weighs 365 g with yarns trimmed
& weaved in. Weight does not include
gauge swatches.
The amount of recommended yarn for the whole project
(including gauge swatches) are 7 (8, 9) skeins of Main Color (MC), 1 (2, 2) skeins
of Contrasting Color 1 (CC1), & 1 (2, 2) skeins of Contrasting Color 2 (CC2),
listed in the Materials section below.
When in doubt, always get an extra skein.
.Materials, Tools, & Notions:
-Yarns: KnitPicks Galileo 50% Merino wool, 50%
Viscose from Bamboo, Sports weight in Apollo #29513 (MC), Valentine #26098
(CC1), & Nebula #26096 (CC2) – 131 yds/50g.
-Needles: 1) 29”
& 16” circular needle (CN) in US 6 or 4.00 mm;
2) 29” circular needle (CN) in US 4 or
3.50 mm.
-All else: Stitch markers, 4 split ring
markers, waste yarn, tape measure, yarn needle, & scissor.
Gauge:
-Blocked gauge in St
st (knit in-the-round, held double, using US 6 CN):
9.5
sts x 13.5 rounds = 2” x 2”.
-Blocked gauge in
colorwork st (knit in-the-round using US 4 CN, following Figure 1):
14 sts x 15 rounds = 2” x 2”.
INSTRUCTIONS
Shoulder Seams
CO 4 (4, 4) sts with MC held double using the US 6
(4.00 mm) 29” CN.
Row 1 (RS): Kfb, pm,
k2, pm, kfb. (6 sts)
Row 2 (WS): P1, pfb,
sm, p2, sm, pfb, p1. (8 sts)
R3: Knit to 1 stitch before
marker, kfb, sm, k2, sm, kfb, knit to end. (10 sts)
R4: Purl to 1 stitch before
marker, pfb, sm, p2, sm, pfb, purl to end. (12 sts)
For size Small:
For the odd numbered rows 5, 7, 9, & 11, repeat R3.
For row 6, repeat R4.
For rows 8 & 10, work the neckline
shaping row below while maintaining shoulder slope increases.
R8 & 10 (WS):
P1, mlLp, purl to 1 stitch before marker, pfb, sm, p2, sm, pfb, purl to 1
stitch until end, m1Rp, p1.
There should be 30 stitches after completing R11.
For size Medium:
For the odd numbered rows 5 & 7,
repeat R3.
For the even numbered rows 6, 8, 10,
& 12, repeat R4.
For rows 9 & 11, work the neckline
shaping row below while maintaining shoulder slope increases.
For R9 & 11 (RS): K1, m1R, knit to 1
stitch before marker, kfb, sm, k2, sm, kfb, knit to 1 stitch until end, m1L,
k1.
There should be 32 stitches after completing R12.
R13 (RS): Knit across the
shoulder seam with no increases.
For size Large:
For the odd numbered rows 5, 7, 9,
11, & 13 repeat R3.
For row 6 & 8, repeat R4.
For rows 10 & 12, work the neckline
shaping row below while maintaining shoulder slope increases.
R10 & 12 (WS):
P1, mlLp, purl to 1 stitch before marker, pfb, sm, p2, sm, pfb, purl to 1
stitch until end, m1Rp, p1.
There should be 34 stitches after completing R13.
For all sizes:
Break yarn & make another shoulder seam on the
same CN.
Neckline Cast-On & Shoulder Cap
Adjustment:
The shoulder caps should be facing each other on the
CN, & the live sts facing away.
NR (RS): Pm (BOR), *CO 31
(33, 34) sts using the backwards loop method, knit across one shoulder seam &
while rearranging markers so there are 4 stitches in between the markers (move
markers one stitch to the right/left)*, repeat * to *. (122, 130, 136 sts)
Sleeve Cap Shaping
The shaping of the sleeve cap will be
divided into three sections a, b, & c of 11 (12, 14) rounds each, where
two-thirds of the increasing will be done in section a, one-third of the increasing
in section b, & no increasing will be done in section c.
R1a: *Knit to marker, sm,
kfb, knit to 1 stitch before marker, kfb, sm*, repeat * to *, knit to end. (4
sts increased total, 2 for each sleeve)
For size Small:
R2a – R11a:
Repeat R1a.
R1b, 3b, 5b, 7b, 9b, & 11b:
Repeat R1a.
R2b, 4b, 6b, 8b, & 10b:
Knit all stitches (no increases).
For size Medium:
R2a - R12a: Repeat R1a.
R1b, 3b, 5b, 7b, 9b, & 11b: Knit
all stitches (no increases).
R2b, 4b, 6b, 8b, 10b, & 12b: Repeat
R1a.
For size Large:
R2a – R14a:
Repeat R1a.
R1b, 3b, 5b, 7b, 9b, 11b, 13b, & 14b: Knit
all stitches (no increases).
R2b, 4b, 6b, 8b, 10b, & 12b: Repeat
R1a.
For all sizes:
There should now be 38 (40, 44) stitches
for each sleeve.
Knit all stitches for the 11 (12, 14)
rounds of section c.
Underarm Shaping & Cast-On
NR1: *Knit to 1 stitch
before marker, m1L, k1, sm, knit the sleeve stitches, sm, k1, m1R*, repeat * to
*, knit to end. (4 stitches increased for body)
NR2: Knit all stitches.
Repeat last 2 rounds twice. (12 stitches
increased total for body)
NR: *Knit to marker,
remove marker & transfer sleeve stitches onto waste yarn, remove marker, CO
5 stitches using the backwards loop method, pm, CO 5*, repeat * to *, knit to
end. (20 stitches increased for UAs)
There should now be 146 (154, 160) stitches total for
body.
Increasing for Chest
Put in an increase marker in the next round. BOR marker will also serve as another
increase marker.
NR: Knit to 21 (22, 23) stitches
from the other side marker, pm, knit to end.
Work increase round next & follow instructions for
each size.
For size Small:
Inc R1: K1, m1R, knit
until 1 stitch before marker, m1L, k1, sm, knit to end. (2 sts increased, 148
sts total)
Continue to work in St st until garment measure ~0.5”
from underarms.
Inc R2: K1, m1R, knit until 1 stitch before marker, m1L, k1, sm, knit until side marker, k1, m1L, knit until 1 stitch before the other side marker, m1R, k1, sm, knit until end. (4 sts increased, 152 sts total)
Continue in St st until garment measures ~1.5" from underarms.
For size Medium:
Inc R: K1, m1R, knit
until 1 stitch before marker, m1L, k1, sm, knit until side marker, k1, m1L,
knit until 1 stitch before the other side marker, m1R, k1, sm, knit until end.
(4 sts increased, 158 sts total)
Repeat Inc R above when garment measures ~0.5" from the UAs. There should now be 162 stitches.
Continue
in St st until garment measures ~1.5” from underarms.
For size Large:
Inc R: K1, m1R, knit
until 1 stitch before marker, m1L, k1, sm, knit until side marker, k1, m1L,
knit until 1 stitch before the other side marker, m1R, k1, sm, knit until end.
(4 sts increased, 164 sts total)
Repeat Inc R above when garment measures ~0.5” &
0.75” from the UA’s. There should now be
172 stitches.
Continue in St st until garment measures ~1.75” from
underarms.
Decreasing for Waist
For size Small & Medium:
Work the following decrease round (Dec R) when garment
measures 1.5”, 2.5”, 3”, 3.5”, & 4” from the underarms.
For size Large:
Work the following decrease round (Dec R) when garment
measures 1.75”, 2.75”, 3.25”, 3.75”, & 4.25” from the underarms.
Dec R: K1, ssk, knit to
3 stitches before marker, k2tog, k1, sm, knit to side marker, sm, k1, ssk, knit
to 3 stitches before marker, k2tog, k1, sm, knit to end. (4 sts decreased)
After working all the decreases, there should be 132
(142, 152) stitches.
Transitioning to Colorwork
Break yarn & reattach a single strand of MC from
the right side-marker, & switch to US 4 or 3.50 mm 29” CN.
To correct for the gauge difference between the
Colorwork st & the 2-strand St st, the number of stitches will be increased
to 196 (210, 224) stitches.
Increasing suggestion:
To increase evenly, I divided the stitches into alternate sections of 9 &
10 stitches. Each of these sections will
be increased to 14 stitches.
Starting with the 9-stitch section, I increased on the
1st, 3rd, 5th, 7th, & 9th
stitch by knitting the 2 strands on these stitches as 2 individual stitches
& the rest of the stitches as one stitch. (14 sts)
Then for the 10-stitch section, I increased on the 2nd,
4th, 7th, & 9th stitch to make 14
stitches.
Alternate between increasing 9 & 10 stitch sections. The 9-stitch section will be worked 8 (8,
8) times & the 10-stitch section worked 6 (7, 8) times.
Start working the color chart Figure 2 (3, 4). Repeat
the Boxed section for a total of 7 (8, 8) times each for
front & back of body.
After finishing all rounds of Figure 2 (3, 4), start
1x1 ribbing in CC2 & work until desired length or just before 2” for size
Small. BO loosely.
Collar
Work the first round of the collar as follows:
·
Using the US 6 or 4.00 mm 16” CN &
with MC held double, start from the middle of one shoulder cap & *PU 10
(10, 12) stitches (about every 3 out of 4 stitches) along the
slanted edge.
·
PU every stitch along the horizontal edge for
size Small & Medium. For size Large
PU almost every stitch to make 33 stitches (31, 33, 33
sts). Put split ring markers in the
first & last stitch of the horizontal edge.
·
Continue to PU another 10 (10,
12) sts along the slanted edge on the other side of neckline* &
place side marker. Repeat * to *, then pm(BOR).
NR: *Work in 1x1 ribbing
starting with a knit stitch until 1 stitch before split ring marker, p2tog
& adjust marker, work in ribbing starting with a purl stitch until marker,
ending on a purl stitch, p2tog & adjust marker, work in ribbing starting from
a knit stitch until side marker & end on a knit stitch*, sm, repeat * to *.
(The shoulder caps should have two consecutive knit stitches & the
corners of the neckline should have two consecutive purl stiches.)
NR: Work 1 round in
established pattern.
NR: Continue working in
established pattern except p2tog the 2 consecutive purl stitches at the corners
& remove the split ring markers. (4 sts decreased)
Work another round in established pattern with the MC,
then switch to CC1 held double (For size Small, you may have to divide your
yarn ball in two) & work 1 round of ribbing.
BO loosely in pattern with CC1.
Sleeves
Arrange the live stiches onto the 29” US 6 (4.00 mm)
CN to work in the magic loop method.
With MC held double, start from the middle of the underarms
& PU 5 stitches. Knit across the
live sleeve stitches, then PU another 5 stitches & place marker.
Continue in St st until sleeve measures ~3” (3”,
3.25”) from the underarms. Switch to 1x1
ribbing.
At just under 1” of ribbing, or about 7 rounds worked,
switch to CC1 held double & work 1 round.
Then BO loosely in CC1.
Make the other sleeve.
Weave in ends & block garment.
-----------------------------------------------------------------------------------------------------------------------------
Endnotes: Thank you for your interest in my design! Please look for me on:
Instagram: @wendylinkdesigns
Ravelry: Wendy Link
Further support can be made in my Kofi Shop.
Abbreviations:
BO: Bind off.
CC: Contrasting color.
CN: Circular needle.
CO: Cast on.
Kfb: Knit both front & back loops to increase 1.
Kfpb: Knit front loop, purl back loop to increase 1.
M1l: Make one left.
M1lp: Make one left purl.
M1r: Make one right.
M1rp: Make one right purl.
MC: Main color.
NR: Next row or round.
PCO: Provisionally cast on.
Pfb: Purl both front & back loops to increase 1.
Pfkb: Purl front loop, knit back loop to increase 1.
Pm: Place marker.
Pm(BOR): Place beginning of round marker.
PU: Pick up.
RS: Right side.
Sm: Slip marker.
St st: Stockinette stitch
UA: Underarm.
WS: Wrong side.
Figure 1. Pattern used for Gauge Swatch
Pattern is a multiple of 12 + 5
stitches.

Figure 2. Colorwork Stitch for Size Small

Figure 3. Colorwork Stitch for size Medium.

Figure 4. Colorwork Stitch for Size Large

Errata: